The truth is, Squarespace is pretty generous with font options that you can use on your website. However, if you’re looking for a particular custom font that is either part of your branding or in order to get a specific effect, chances are - you won’t find it inside your Site Style options. The good news is that you can upload ANY font to Squarespace in 3 easy steps. Today we’re going to show you how to do that.
How to upload Custom Fonts to Squarespace

It goes without saying, great typography that visually supports your imagery is always a winner. In today’s article, we will show you how to stay consistent with your aesthetic, customize the look of your website to your brand fonts and easily upload and use any custom font on your Squarespace site. This tutorial explains how to upload custom fonts to Squarespace 7.0 version websites, but the same exact principle applies to Squarespace 7.1 websites, as well.
Step 1: Upload your font
First, you want to make sure you have your font’s file available and ready to use. Please double-check and make sure you have full rights of usage. If you’re not sure where you can get legit fonts, there are plenty of resources like Font Squirrel or Google Fonts that offer free fonts, and Creative Market for beautiful custom fonts you can purchase at a price of $20-$30.
Next, go to your Squarespace dashboard, Design > Custom CSS, scroll all the way to the bottom and click on “Manage Custom Files”. Upload or simply drag and drop your font file. It should come in either a .ttf, .otf or .woff format - so make sure you have the correct file at this point. Once you do that, your font is successfully uploaded to your Custom Files.
Step 2: Add your font to CSS code
Now that you have your font uploaded to your Squarespace site, you need to “tell” Squarespace where to find it and assign the font to a specific heading on your site. This step requires a bit of CSS tweaking, but it’s not too complicated, we promise. Once you get the hang of it, the rest is a piece of cake.
First, we recommend you to create a test styling page with text on it, and assign H1, H2, H3 and Body stylings to it, so you can see the changes in real-time. Then, go to your Squarespace dashboard, Design > Custom CSS and copy and paste the following snippet of code inside the Custom CSS box. If you already have some code here, just paste it all the way at the bottom.
@font-face {
font-family: 'FontTitle';
src: url('FontURL');
}
h1 {font-family: 'FontTitle';}
Now go ahead and edit your CSS code in order to further stylize your font:
Change FontTitle to the name of your font. In our case, it’s JosefinSans.
Update the Font URL. To change FontURL, you'll need to click on Manage Custom Files, and then click on your font file. As soon as you do that, you will see an URL automatically pasted within the Custom CSS box.
Change H1, H2, H3 or P (for Body text) by tweaking FontTitle for each heading, to the name of your font - JosefinSans in our case. You will notice how the text for each heading changes in fonts as you update the CSS code.
Now that your font was applied, you can go ahead and hit Save.
Watch this video tutorial, as it explains how to do that.
This video shows how to apply the same font to all your headings and to your body text. If you want to have different fonts for different headings, simply upload multiple font files to your Squarespace site and go through the above steps as many times as you need. Know that you can also change things like color or font size directly from your Site Style Settings. Just head over to Heading 1, Heading 2, etc. and experiment from there. All of the settings will still work, only the font will be different.
Step 3: Further Stylize your Custom Font
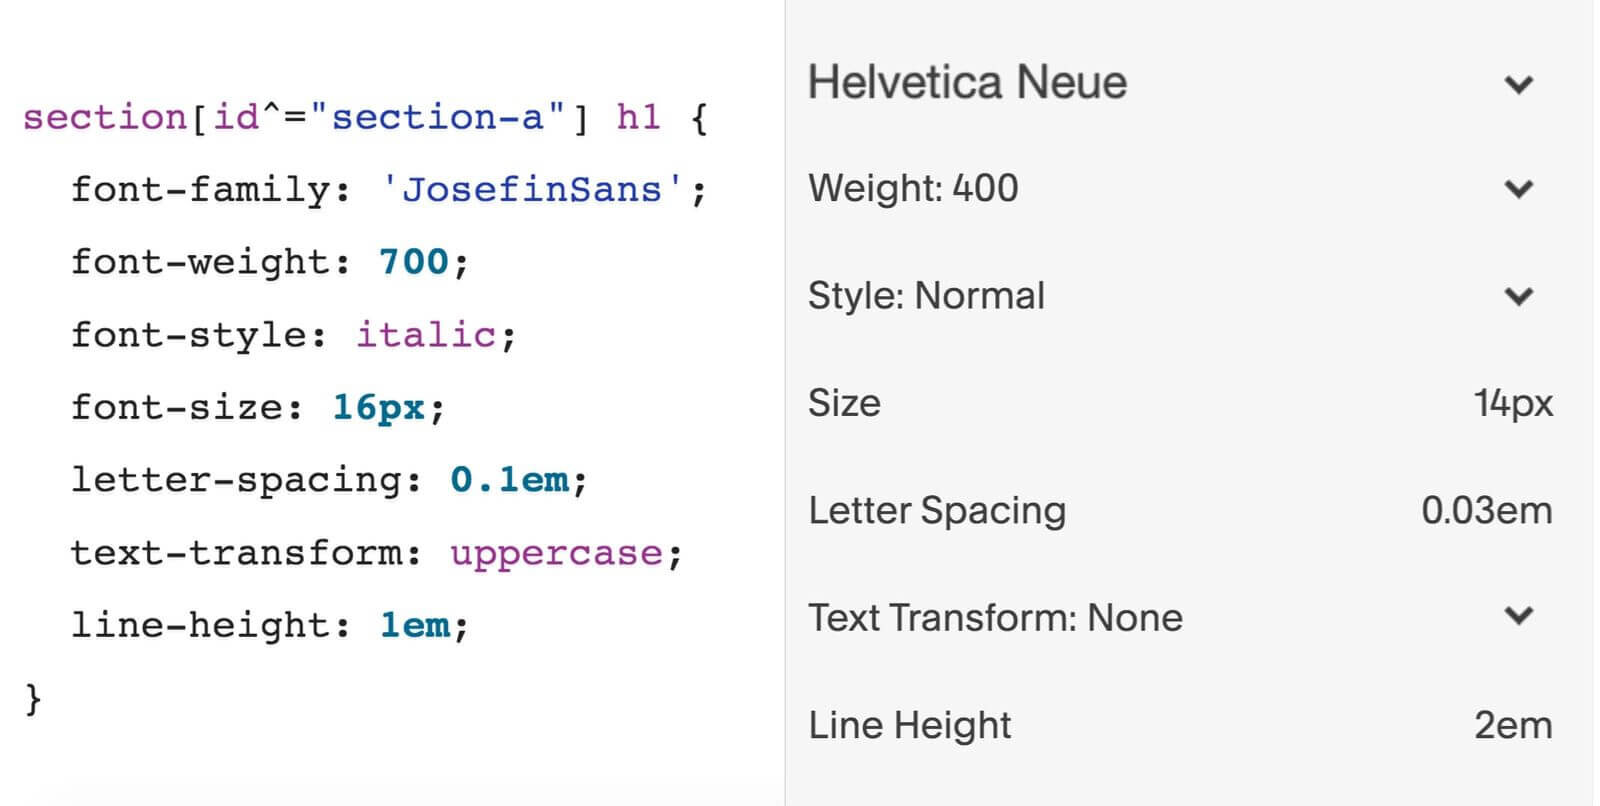
While most custom fonts that you upload on your website can be stylized via the usual Site Styles panel, this is not the case for all fonts, as some font files do not support the stylization via Site Styles. Here is how you can stylize your custom font by adjusting your CSS code. Once you decide which font properties you’re going to stylize, start writing your CSS code - it’s not hard, we promise! On the image below you can see the CSS properties that you need to write depending on what you need to adjust versus the font settings from the Site Styles panel. If you’d like to stylize one single font property (ie. the font size), just add the “font-size” CSS property inside the { } brackets.
Watch this video to learn how to stylize your Custom Fonts inside Squarespace, via CSS code.
Here is the CSS code snippet that you can copy and use to stylize your font.
h1 {
font-family: 'fontTitle';
font-weight: 700;
font-style: italic;
font-size: 16px;
letter-spacing: 0.1em;
text-transform: uppercase;
line-height: 1em;
}
If you have a Squaremuse Design Kit or Pricing Kit set up on your website, and you’d like to replace the assigned custom fonts to H1, H2, etc. with your own custom font, here is what you need to do:
Upload your font as mentioned in Step 1 of this article.
Replace the Font URLs of those particular fonts in the existing Design/Pricing Kit CSS code with the Font URLs of the custom font you uploaded on Squarespace separately.
Replace the FontTitle to the name of your font.
Change the font-family name inside CSS for the needed styling element (refer to Step 2 of the article).
Now that your font was applied, you can go ahead and hit Save.
In the documentation of your design kit, you will find which styling element has a font assigned via CSS along with its code line. Simply find the code line of the element’s font and replace the font-family name with yours. If you decide to further stylize your custom font, refer to Step 3 of the article.
If you are looking to use Adobe Fonts for your Squarespace site, check out this tutorial that explains how to do it. Adobe Fonts can be added only for the 7.0 version of Squarespace.
Please note that this article is created to educate and help you improve your website. Squaremuse is not responsible for any changes you make to your website’s code. Basic CSS knowledge is required in order to be able to implement the above suggestions.
~
Looking for cool font combinations? We’ve prepared a collection of the most popular font & color trends, already available inside Squarespace style settings and ready to be implemented immediately. Download them here.
Creatively Yours,
Squaremuse Team